
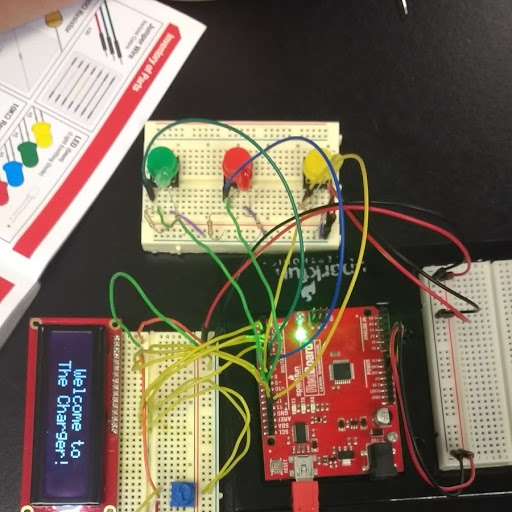
For this project, my partner Tyler and I built up from the ground in our knowledge in circuits all the way up to combining it with coding and software. After a while of doing this with pre written programs and drawings of the circuits we wrote our own code from scratch and built our own circuit to do something cool. The point of this project was to develop and advance our technical knowledge. For Tyler and I's project we created a reaction mini game where a light turns on and you have 0.35 seconds to click the corresponding button. We also hooked up an LCD to display what is happening. Down below are the circuits we set up for the game:
Below is the code we wrote:
#include <LiquidCrystal.h> //Includes library for the LCD
LiquidCrystal lcd(12,11,5,4,3,2); //Tells the library what pins we are using
int conditionsTrue = 1;//Creates integers
int charge = 0;
int button = 0;
int input = 0;
void setup() {
pinMode(8, INPUT);//Turns PushButton pins to input
pinMode(9, INPUT);
pinMode(10, INPUT);
pinMode(6, OUTPUT);//turns LED pins to output
pinMode(7, OUTPUT);
pinMode(13, OUTPUT);
lcd.begin(16,2); // tells lines and collums we have
lcd.clear(); //Clearing any previous displays from LCD
lcd.print(" Welcome to "); //Displays words on LCD
lcd.setCursor(0,1); //Moves invisible cursor
//Next series of code will display a series of messages on the LCD
lcd.print(" The Charger! "); //Displays a message
delay(5000);//Delays The Computer
lcd.clear();//Clears LCD screen
lcd.setCursor(0,0);//Moves Cursor
lcd.print(" Get Ready!");//Displays a message
delay(1000);//Repeating series to print a series of messages
lcd.setCursor(0,1);
lcd.print(" 3...");
lcd.setCursor(0,1);
delay(1000);
lcd.print(" 2...");
lcd.setCursor(0,1);
delay(1000);
lcd.print(" 1...");
lcd.setCursor(0,1);
delay(1000);
lcd.print(" Go! ");
delay(1000);
lcd.clear();
lcd.setCursor(0,0);
lcd.print(" Charging...");
}
void loop() {
if (charge == 100)//Checks win condition
{
lcd.clear(); //These three make the screen say You Won!
lcd.setCursor(0,0);
lcd.print(" You Won!");
}
else if (conditionsTrue == 1)//Checks if the button testing variable is true
{
delay(500);
digitalWrite(13, LOW);//turns LEDs off
digitalWrite(7, LOW);
digitalWrite(6, LOW);
delay(1000);
lcd.setCursor(0,1);//These 3 print the percentage you have charged
lcd.print(charge);
lcd.print("%");
conditionsTrue = 0;//resets button checking variable
delay(10);
button = (random(8, 11));//Chooses a random pin #
if (button == 8)// checks which # is outputted
{
digitalWrite(13, HIGH);//turns on corresponding LED
}
else if (button == 9)//Same Process
{
digitalWrite(7, HIGH);
}
else if (button == 10)//Same Process Again
{
digitalWrite(6, HIGH);
}
delay(350);
input = digitalRead(button);//sets input to equal 0 if the button is pressed or 1 if it isnt
if (input == 0)//checks to see if you hit the button
{
conditionsTrue = 1;//sets button checking variable to true
charge = charge + 5;//changes percent charge
}
}
else//activates if you didn't press button in time
{
lcd.clear();
lcd.setCursor(0,0);
lcd.print(" You Lost");//prints You Lost
}
}
In order to get to the point where we could create our own project, we had to learn about hardware and software. We started by experimenting with electricity. There was a series of circuits we set up and answered questions about. After we completed that, we moved onto bread boards. These were a lot easier to set up and use compared to holding the components by hand. We also used more components like the voltmeter and ammeter to measure current and voltage. We did more experiments and answered more questions on them. At the end of this we took a "quiz" to set up a circuit to make a light blink on and off. When you completed it you moved on to using a computer too. We would set up the circuit and connect it to the computer to run the code on it, after seeing what happened we would read through the comments left throughout the code and see what each thing did. After going through each activity we created the final project.
Content:
Circuit: Conductive material connecting one terminal of a battery to the other
Current: The flow of electric charge through a circuit
Resistance: How much a material prevents the flow of electricity through it
Voltage: Electric potential energy per unit charge
Bread Boards: A board with multiple electrically separated rows where each pin in the row is electrically connected
Coding: Some basic lines of code used in our project are listed below:
digitalWrite(pin#,HIGH/LOW); : sends either 0 volts or 5 volts of power through specified pin, depending on whether it says high or low
pinMode(pin#,INPUT/OUTPUT); : sets a pin to either take input or send output
int [name] = [value]; : makes a custom named variable that is set to a certain numeric value
void setup() : runs commands in the curly brackets once
{
}
void loop() : Runs commands in curly brackets over and over
{
}
Conclusion:
Over all I really enjoyed this whole project. I really like computers and I feel this helped reinforce my knowledge in coding. I feel like I was able to use my past experience to help my partner, who is new to this, learn it better. While I did that well I feel like I didn't have him do as much as I should have, I was in a leadership role but didn't fulfill it to well. Other than that I was really efficient and learned fast.
